Saturday, January 31, 2015

Valentine's Day Pretty Fabric Gift Bags.....

I'm IN LOVE with pretty little fabric gift bags! I'VE PUT SOME NEW ONES IN MY ETSY SHOP TODAY! Pretty cottage chic fabric gift bags approximate 8"x10" in size:

I'

Each with their own pretty little tag of a teapot or teacup.  Go  here at my Etsy Shop to purchase a lavender bag and tag - $6.79 each.
Black grosgrain ribbons sewn in seams to tie it closed.

Look at those beautiful teapots.... in peach and lavender. It's really lavender, not blue. My camera would NOT pick up the lavender colors! The tags are a piece of fussy cut fabric that I've glued onto the tag.. and sprinkled glitter here and there.
I made adhesive round stickers (that come off easily) to put on the fabric bag, inviting the user to use it again and Go Green!


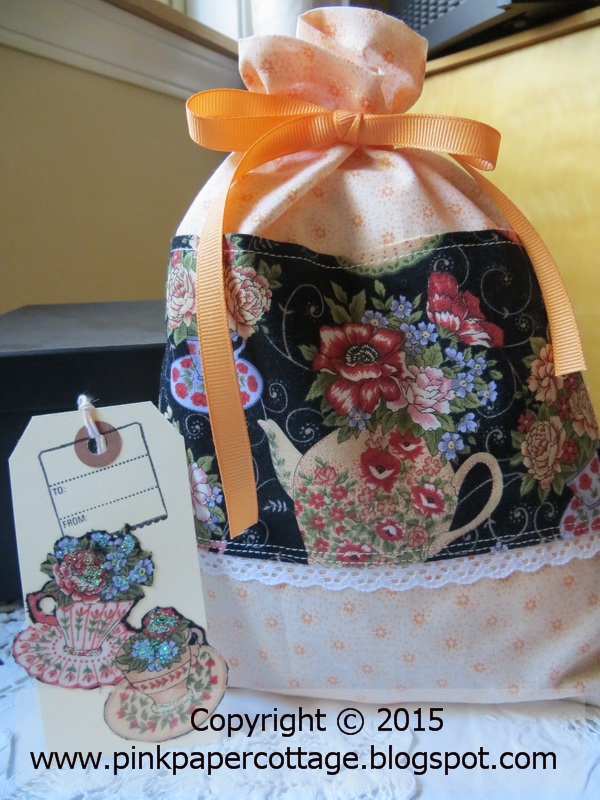
Here are the peach colored bags:


Soft pretty peach fabric with the darling teapots and teacups fabric trim, with lace tucked under the edge. Do you love teapots as much as I do? My sisters collect them and so did my mom. I would too if I had the room!  You can purchase a peach fabric bag with tag here at my Etsy Shop.


Twins.............. I have two of each color.
These gift bags surprisingly hold alot. You can get an adult woman's T-shirt in one, several hand towells or kitchen towells, and they could also be used for overnight trips as they'll hold your pretty underthings, an extra T-shirt and a few toiletries.  Great also for a little girl's dolls and doll clothes or a set of their favorite things to take along with them in the car. (See below for other uses).
I've in love with these tags.... all glittery and pretty.
I also have two cute muslin decorated bags, just perfect for tucking with candy treats or jewelry.........or lipsticks............... nail polish, etc. These are 4 x 5-1/2"...... perfect for little bits of this or that.   Here's the link to my Etsy shop to purchase a muslin bag for $4.00.


God Loves you and So Do I.

I've sold this lavender stamped muslin bag, but see how pretty it looks stuffed with goodies and sitting in a cut glass bowl?? Love these little muslin bags!
Last but not least!............... my sweet little retro kitty gift bag or carry-bag. This is a fairly heavy authentic vintage retro fabric (8"x10" in size). Love.e.e.e.e. it!  Click here to go to my Etsy shop to purchase this little bag for $5.00. No tag with this one but I could make up a little tag if you desire.


Trimmed with a linen look fabric and delicate cream lace... ties are tan grosgrain ribbon. 

A fabric bag can be used in some of these ways:

- gift wrap for a present (and so easy - no more paper, tape and scissors)
- travel bag (for underwear, socks, delicates, jewelry)
- paperback book bag
- organizer
- small toy bag for kids
- protect valuables and keepsakes from dust
- store small photo albums or mini albums
- store ipods, cords, small electronics 


Tucks neatly in your suitcase for travels, and can be used and washed over and over.


Enjoy looking! I have some more gift bags ready to go into my shop next week! 

   photo Blogsignature2smallersizeforblog_zps20ad3d10.png

Sunday, January 25, 2015

I have 15 Tutorials.... do you want more?

Hi ladies, I was just looking at my blog and realized I have 15 tutorials! ................painstakingly done and very detailed............    ......... and I want to know, DO YOU WANT MORE?  (please keep reading dear friends.....)


Wow.... I had to go back and see just what they were and I must admit, there are some good ones.  Go to each link to see pictures.

Here's a list with links to each one, in case you are a newer follower:

March 26, 2013:
Fabric Yo Yo's Tutorial (so cute!)

May 13, 2013:
Mini Tag Merry Go Round Album Tutorial - Part I  (oh my - gorgeous!)

June 21, 2013:
Paper Rosettes Tutorial (you gotta' learn how to make these!)

July 20, 2013:
Mini Tag Merry Go Round Album Tutorial - Part II

August 9, 2013:
Easy Fun Postcards (mail them out!)

August 20, 2013:
Frugal Crafting Ideas - Part 1

August 27, 2013:
Frugal Crafting Ideas - Part 2

September 3, 2013:
Frugal Crafting Ideas - Part 3

October 27, 2013:
Holiday Planner Tutorial (awesome and could be used for any time of year)

November 13, 2013:
Playing with Pins (clothes pins that is)

February 20, 2014:
Fonts Galore (how to upload fonts to your computer and where to find)

March 6, 2014:
Layouts Galore and Tutorial for You (using Studio J digital scrapbook program at Close to My Heart)

March 17, 2014:
15 Minute Quick Cards #1

March 21, 2014:
Turn Old Catalog Pages into Envelopes and Flowers  (nifty!)

April 14, 2014:
Paper Radiant Star Tutorial (if nothing else, go check this one out!)

May 9, 2014:
15 Minute Quick Cards #2

November 9, 2014:
One Brown Bag Brag Wallet (really fun and easy)

There you  have it. You can see between May and November, I was busy doing other things, such as house hunting. We never did find anything "just right" for us. Maybe next summer we'll look again.

For now, keep this list handy. You just may want to make something new and different. I try to make my tutorials very detailed, and something different and unusual. You can always go to the "search this blog" box in the right-hand column of my blog, to search for my tutorials.

My questions now is... DO YOU WANT MORE TUTORIALS???? Please let me know!  If I don't hear from anyone via comments, I probably won't post anymore, although I do have some dandies ready to go.

   photo Blogsignature2smallersizeforblog_zps20ad3d10.png

Friday, January 23, 2015

Masculine music card with burlap.

What kind of card do you make for a guy who loves music and guitars?........ A "grungy" sort of guy who loves black? This is a what I came up with!


I used a 5x7 black card base, vintage music paper, burlap, and some Graphic45 paper (a mat behind the sheet music) to stack up my elements.
I've got burlap peeking out of the back and another piece on the bottom. My sister gave me a HUGE piece of burlap that was used to wrap a Christmas gift she got for her husband. How lucky was that? I'm going to make good use of that burlap! I just cut off a piece about 5 x 7 inches and pulled threads out to make it frayed. I cut another little piece for the bottom.


This card was a birthday card for my stepson, who loves music and plays the guitar. I found some vintage sheet music from Karen at The Graphics Fairy, and grunged it up some more with black ink. You can barely see it here. I wish I would have let it show more.  I also found some little music quotes from different free online sites, and printed them on cream cardstock, then cut them out and grunged them up with black ink.  I used some little Tim Holtz stick pins to poke them into the burlap.


I left the top of the guitar cutout open to act as a little pocket for these tickets. Another freebie I found at The 80s Me blog. Her blog is darling, and has lots of other neat kinds of tickets. These were music tickets. The piece of "string" is a thread I pulled out of the burlap.
I had a HECK of a time finding some neat guitar graphics! I looked on Etsy and various online image sites, but nothing was "pretty". I have to have something pretty on my cards! I finally found some at a site called SeoDesigns. They have all sorts of neat downloads such as graphics, vectors, brushes, etc. I printed one on cream cardstock, and then cut it out using some of my fancy edge (cheap) scissors.

I found this site when I was searching "google images" for guitar graphics. Google Images is a great place to go when you're looking for something in particular.


The inside of my card uses some more Graphic45 paper at the bottom. The sentiment is one I found online and I used a fancy font that I found at KevinandAmanda.com. I typed the sentiment and then printed it out on cream cardstock and cut the edges with my fancy edged scissors. KevinandAmanda have some awesome fonts. 

I also made a little sheet music envelope to hold (of course!) some cash. I used the We Are Memoray Keeps Envelope Punch Board (6x6 piece of paper and 3x4 sized envelope), and made it a look vintage by inking the paper and edges with Tim Holtz vintage photo distress ink.

By the way, my stepson absolutely LOVED this card! I think it's definitely a guy card. He noticed every little element I used and said he's going to keep it forever! Made me feel really good.

Have you made any masculine cards lately and if so, where can I see them?
   photo Blogsignature2smallersizeforblog_zps20ad3d10.png

Saturday, January 10, 2015

Oooohhhh..... lookie.... lookie........

Lookie.... Lookie... what I have in my Etsy shop! 


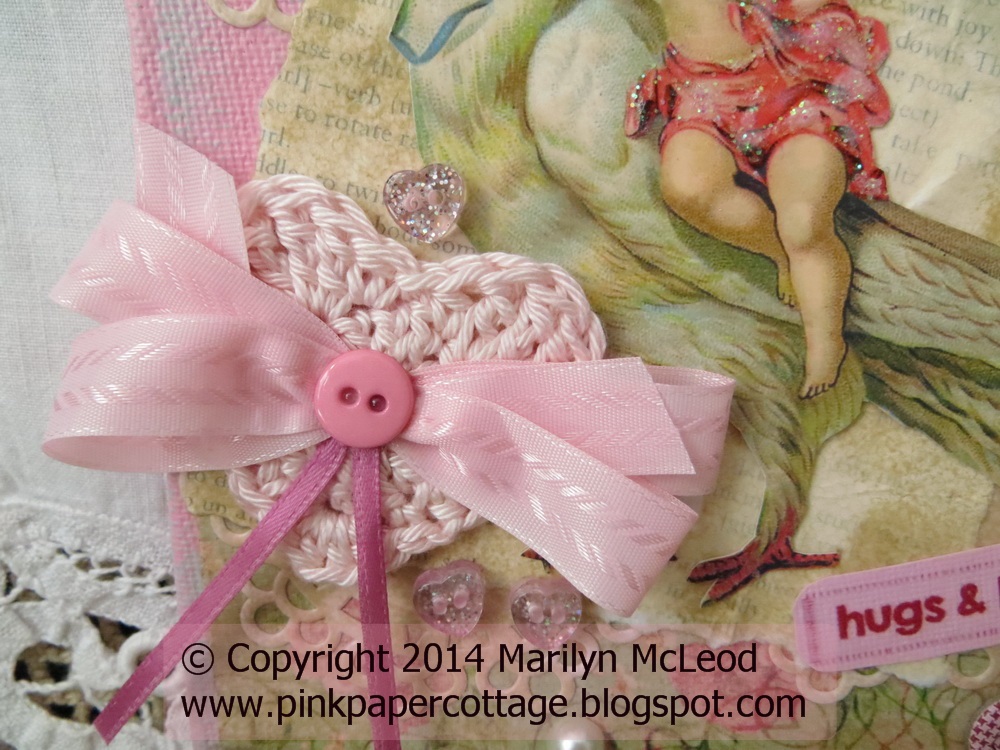
Canvas board pink wall hanging, Valentine's Day, vintage, painted, dove and cherub, crocheted heart, buttons, lace, ribbon, 5"x7" ($16.00).  Link to this item in my Etsy shop.

Decoupaged and built by me!  Pretty little crocheted heart that I made myself.


Vintage image from Karen at The Graphics Fairy.  I love her vintage images!


Doilies and a cute paper banner across the top. And oh such a pretty pink on the canvas... with a slight sheen from the decoupage.


A fabric ruffle along the bottom, some lace, buttons and pearls.


And such a delight.. my red Valentine's canvas board, for someone oh so sweet and girly!


Canvas board wall hanging, Valentine's Day, vintage girl, painted, love words, crocheted heart, buttons, lace, red ribbon, 5"x7" ($16.00). Link to this item in my Etsy shop.

Another vintage image from The Graphics Fairy. Doilies, buttons and bows....little gems and pearls....


And of course, a sweet fabric ruffle at the bottom!.... and a pretty red crocheted heart that I made.


Such a special gift.... hang on the wall, a doorknob, the knob of a cabinet or hutch, or a hook on a wall shelf.  So pretty for your special someone!

Thank you dear readers for following me and taking the time to read my posts!


   photo Blogsignature2smallersizeforblog_zps20ad3d10.png

Thursday, December 25, 2014

Peace and blessed wishes.

A winter kind of beauty,
A Christmas kind of happy,
A family kind of warmth and caring....
May the holidays hold all this for you!


MERRY CHRISTMAS TO MY BLOG FOLLOWERS, AND FRIENDS AND FAMILY!

 photo Blogsignature2smallersizeforblog_zps20ad3d10.png

Wednesday, December 24, 2014

I'm addicted to tiny little envelopes and fork bows!

I've yearned for the We Are Memory Keepers (WRMK) Envelope Punch Board ever since it was introduced a few years ago. Although I could make envelopes with the Martha Stewart score board, I finally caved in and bought myself a WRMK envelope punch board a few months ago, because I was sure I NEEDED it!


Lookie.... lookie what I made!  I'm so hooked.
And I did need it, and I love it! I've watched a ton of YouTube videos to find out how to use it. There are so many uses for this little cutie envelope punch board........

But...........wait! ...........the other day, I found one of my favorite uses for it, and that is making little 3x4 envelopes out of gorgeous designer papers, and using them as money and gift card holders....... and hanging them on your tree, with the little gift tucked inside! Ingenious!


The gal who did the video (and I can't for the life of me find it now or remember her name- and believe me, I searched), used the 3x4 envelope standing up on the short side end, leaving the flap open on top. She left the top flap unscored and open, punched a hole in it, put some twine or ribbon for a loop, and voila.... ready for a gift card or money, to be hung on the tree! You need double sided paper for this one.  Again I say..... INGENIOUS!  Why didn't I think of that?

On my little envelopes, I chose not to make them for hanging.  I wanted to be able to close them and seal them to put under the tree as a gift.  The ones you close and seal can be made with one-sided paper.  These are so much prettier than those blah white envelopes you get from the stores when you buy a gift card.


A piece of 6x6 paper makes a cute little 3x4 envelope, perfect for gift cards or a money holder.  I had just bought a Simple Stories Country Christmas 6x6 double sized paper pad. I made a whole bunch of the little holders already, but they are long gone and mailed to friends and family. So of course, I HAD to make a bunch more, just in case I needed them! The top tag that is hanging on the tree, uses the Simple Stories papers. I love them!


White on the inside - I use score tape for closing and put it on all of the envelopes at once.
It's amazing all the things you can make with this envelope punch board!  There are tons of YouTube videos to show you how to make bows, little boxes, gift tags, tabs for tags, and envelope mini albums. 

The Crafty Gemini has some really good tutorials on using the WRMK Envelope Punch board if you are interested in finding out more about it. Here's a link to one of her tutorials, We Are Memory Keepers tutorial. She has several good ones.


Here's a tutorial on YouTube by LiveLoveScrap for making paper bows.  Card below is one I made last Christmas with a WRMK paper bow. So many things you can do with this punch board.


These little gift envelopes are so much fun, and fast, and a way to use all that darling 6x6 paper that you have hoarded (um... collected)! I had just bought a pad of Jolee's Boutique Holiday papers by ekSuccess and wanted to use the papers for something, as my cards were all done!  I needed some little gift card envelopes and hadn't thought of using my envelope punch board. Why? I don't know.


I guess making a simple skinny envelope with the opening at the top just hadn't occurred to me.


I had fun decorating each one with little bows, buttons, strips of glitter tape (from Close to My Heart) and odds and ends stickers from my stash. I had sat in front of the TV one night weeks ago, making little "fork bows" from green and red ribbon, and some gold ribbon, as I knew I'd use tons of bows on my cards and other projects. I'm glad I did because I've used every single one.


This is a fork bow - all the bows I use now are fork bows!
If you want to find out how to make a "fork bow", which is super easy to make the perfect little (or big) bow, just do a search on You Tube.  There are alot of videos out there. You actually use a fork (any size) and the bow comes out perfect every time. Here's a very good video by Deb Valder: Variations of fork bows

Here's a pretty little red gingham fork bow below. The paper is some Christmas paper from My Mind's Eye, Countdown to Christmas, that I've had for several years. I just can't seem to use it up! It keeps popping up in my projects. The green paper above is also from this pad of paper.


Here's what these look like undecorated (below), which of course, you can use that way, and just close it with a little piece of sticky tape..... but since I can't leave something alone, I would pop on a little button with a glue dot (at least).


When you put the flap on the end so the envelope is tall, it looks more like a little coin envelope (top picture of the one hanging on the tree). When you put the flap on the longer side, it looks more like a traditional, though mini, envelope.


I had so much fun making these, I could not stop. And I'm in no way trying to promote the envelope punch board or getting paid for this post! (Stampin' Up also has a similar envelope punch board). I just love it, that's all.

Here's some little mini envelopes I made, even smaller! These were for some little mini thank you cards I made. So cute...


Just thought I'd share. These are so bright and fun... a little bright splash of color in an otherwise dull and gray day..... a little bit of joy I'm sending your way.

   photo Blogsignature2smallersizeforblog_zps20ad3d10.png

Tuesday, December 23, 2014

Just had to share............

My husband and I LOVE Pickles comics.... we can relate so well to Earl and his wife!  He found this one today and showed it to me. We both had a good laugh!  Just had to share it, because he knows how much I LOVE fabric, quilting, and sewing.


This could also say "have my ashes scattered at a scrapbooking store...." and we could definitely relate to that too!


  photo Blogsignature2smallersizeforblog_zps20ad3d10.png