Showing posts with label fabric. Show all posts

Thursday, February 2, 2017

Turn fabric into paper!

A couple of weeks ago, I gave you a sneak peek of a project I had started working on.  It was in my "Will it Ever Stop?" post on January 12th.  See?  I had this pile of fabrics and I was doing something with them.


Well... I got my projects done, at least some of them.

I was on a roll that day, scanning some of my Valentine's Day scrapbook papers onto my computer, so that I could reuse the papers and print them out over and over again. (I'm frugal that way). I always forget to do that. I loved this paper and it was getting used up, so I thought, why not?

Those papers were pretty traditional... not shabby or cottage colors that I normally like, and I wanted to make a "shabby" Valentine's Day card... so I thought...hum.m.m.m. maybe I could scan in some of my pretty Valentine's Day and "love" fabrics and print them out as paper. This idea was not new to me or "invented" by me. I've seen people on YouTube scanning in napkins to use as paper, and I've actually taken pictures of some of my different small quilted wall hangings, to use as paper. 

So it began..... I was obsessed with scanning every piece of pretty cottage style or Valentine's fabric I had....... and I spent several hours scanning my fabric from that pile! I had gathered together all of my pretties that spoke to me of love, "cottage", Valentines and "shabby" and got started. I must admit, it was kind of a slow process, but well worth it.

Here are a few of the digital "papers", and I love them all! But don't stop here.. I did make some things too!


This fabric is at least 35  years old! I've had it in my stash forever.


I tore this paper into a strip for the front of a card - a really neat effect.
I ABSOLUTELY LOVE this one (below)! I've been hoarding this little fat quarter for years!


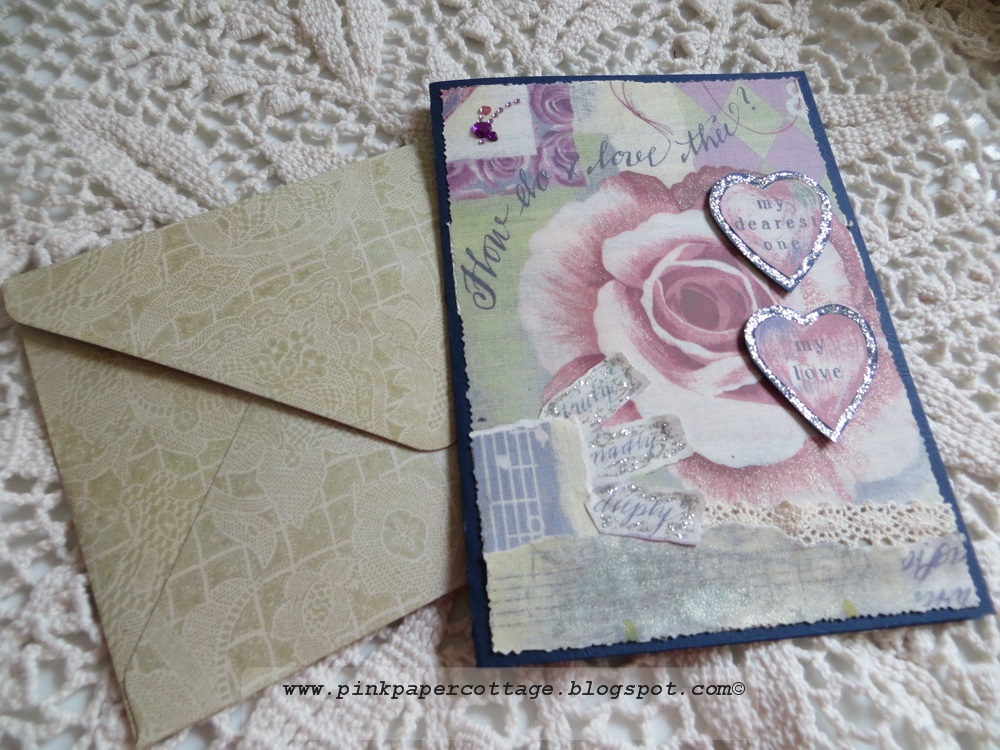
I cut out the little hearts and tags for the front of the card.


Another hoarded one (below)... I could not bear to cut it up and use it for something, but I think I've decided to make a pillowcase out of it for my "cottage style" bedroom. But so glad I made some "paper" first!  If you're not a fabric collector and hoarder, you probably wonder what in the world I'm talking about, right? Treating a piece of fabric like a cherished friend? yup.. that's what we do!

Alot of these, I even "faded out" so that I have some papers that are much softer looking.
What I love about my fabric "paper" is that it actually looks like a REAL piece of fabric glued to the front of the card! Here's what I made.  I put the piece of fabric that I scanned, in front of the card just for fun.


Look close... can you see the actual fibers in the fabric? although this is just paper that I printed out! The scanner did a great job.

I tore strips for the inside, that look like pieces of fabric.


My ALL TIME favorite.... just LOVE this fabric/paper! Swoon.n.n.n.n....... it made the prettiest little cottage shabby card.

Lots of glitter added to my handmade flower.


Each card got a special handmade envelope too.


I had more fun with these and hope to make more.  These three cards are for sale in my Etsy shop, here for the lavender and blue onehere for the "Sweet You" card, and here for my shabby cottage one.

Stay tuned for more projects. I've been on a roll!!!

                 photo Blogsignature2smallersizeforblog_zps20ad3d10.png

Monday, August 24, 2015

Something pretty this way comes....

Here's a sweet little shabby "pretty" that I made the other day. I just wanted to share it with you.  If you're a seamstress, you may have made the radiant star design before. This is much like the radiant star design, and NO SEWING!


Voila! ........ my "shabby chic" ornament..... to festoon my Christmas tree, or any little knob or hook waiting to be presented with something pretty (and pink!).


And how did I make this you say? Well..... no sewing required! That's the first good thing about this project. The other thing is that it's FUN... and you get to use fabrics from your huge fabric stash. Here's the video tutorial by Shabby Fabrics that I watched on YouTube, to learn how to make one of these cute ornamental decorations. 

You just use little 2-1/2 x 2-1/2 squares of fabric (40 squares), either from a jelly roll or from your overflowing scrap stash.... lots of little straight pins (very small head, called satin pins) and a 3" styrofoam ball. Note: use a regular styrofoam ball, not a Smoothfoam ball, as the Smoothfoam is very hard to push the pins into. That's it! Easy peasey. 

You can see the points of the fabric around the top. In each point, there is a little pin stuck in. I glued on the lace and glued on some little pink "fork bows". If you haven't tried a fork bow, go to YouTube and search and you'll find many tutorials. They are so much easier than trying to make a tiny bow! 

My ribbon hanger is a sheer ribbon, with another pink bow. I also added some little pink strands of beads.

This shows the size compared to my hand. Also, I put some lace around the middle instead of ribbon, and put the bow and hanger on top rather than along the side (my mistake... and I just noticed! oh well.. this was my "practice" piece. If you watch the tutorial, you'll see that the "star" design is supposed to be on the side, not the top.)


The above photo is the full design of the little folded squares, which form the star. Normally (if you don't make a mistake like I did!), this design will show on the SIDE of the ornament as it hangs..... not on the top and bottom where it is kind of hidden. 

It's a little time consuming to make this, but sit and watch one of  your favorite movies on TV, and pin away! No iron needed... just your finger and alot of pins. I finally dug out my old thimble, as my finger got a little sore punching those pins in the styrofoam. 

I'm off to start another one, this time using Christmas fabrics... or hum.m.m.m. maybe another shabby one. I love it!

Hope you give this a try. Let me know if you do and send me an email with a photo. They would make great gifts.... and besides...........they're addictive!

 photo Blogsignature2smallersizeforblog_zps20ad3d10.png

Saturday, January 31, 2015

Valentine's Day Pretty Fabric Gift Bags.....

I'm IN LOVE with pretty little fabric gift bags! I'VE PUT SOME NEW ONES IN MY ETSY SHOP TODAY! Pretty cottage chic fabric gift bags approximate 8"x10" in size:

I'

Each with their own pretty little tag of a teapot or teacup.  Go  here at my Etsy Shop to purchase a lavender bag and tag - $6.79 each.
Black grosgrain ribbons sewn in seams to tie it closed.

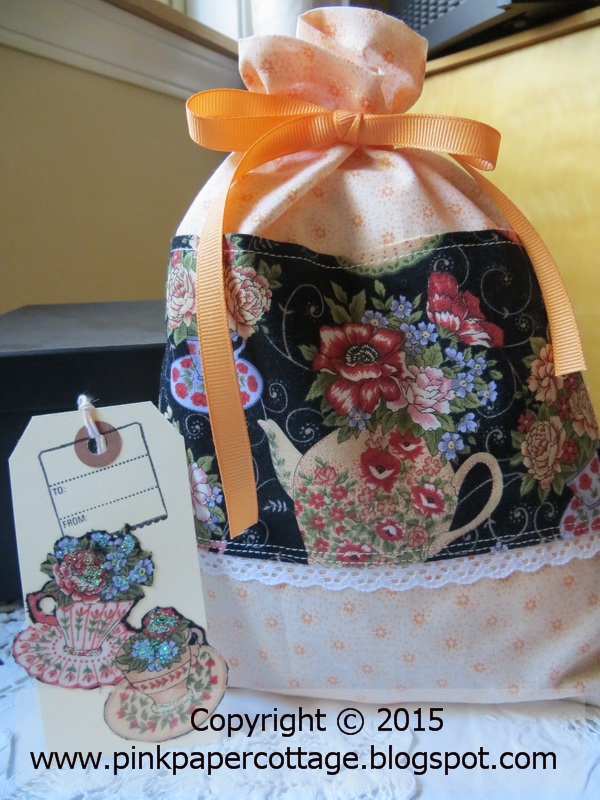
Look at those beautiful teapots.... in peach and lavender. It's really lavender, not blue. My camera would NOT pick up the lavender colors! The tags are a piece of fussy cut fabric that I've glued onto the tag.. and sprinkled glitter here and there.
I made adhesive round stickers (that come off easily) to put on the fabric bag, inviting the user to use it again and Go Green!


Here are the peach colored bags:


Soft pretty peach fabric with the darling teapots and teacups fabric trim, with lace tucked under the edge. Do you love teapots as much as I do? My sisters collect them and so did my mom. I would too if I had the room!  You can purchase a peach fabric bag with tag here at my Etsy Shop.


Twins.............. I have two of each color.
These gift bags surprisingly hold alot. You can get an adult woman's T-shirt in one, several hand towells or kitchen towells, and they could also be used for overnight trips as they'll hold your pretty underthings, an extra T-shirt and a few toiletries.  Great also for a little girl's dolls and doll clothes or a set of their favorite things to take along with them in the car. (See below for other uses).
I've in love with these tags.... all glittery and pretty.
I also have two cute muslin decorated bags, just perfect for tucking with candy treats or jewelry.........or lipsticks............... nail polish, etc. These are 4 x 5-1/2"...... perfect for little bits of this or that.   Here's the link to my Etsy shop to purchase a muslin bag for $4.00.


God Loves you and So Do I.

I've sold this lavender stamped muslin bag, but see how pretty it looks stuffed with goodies and sitting in a cut glass bowl?? Love these little muslin bags!
Last but not least!............... my sweet little retro kitty gift bag or carry-bag. This is a fairly heavy authentic vintage retro fabric (8"x10" in size). Love.e.e.e.e. it!  Click here to go to my Etsy shop to purchase this little bag for $5.00. No tag with this one but I could make up a little tag if you desire.


Trimmed with a linen look fabric and delicate cream lace... ties are tan grosgrain ribbon. 

A fabric bag can be used in some of these ways:

- gift wrap for a present (and so easy - no more paper, tape and scissors)
- travel bag (for underwear, socks, delicates, jewelry)
- paperback book bag
- organizer
- small toy bag for kids
- protect valuables and keepsakes from dust
- store small photo albums or mini albums
- store ipods, cords, small electronics 


Tucks neatly in your suitcase for travels, and can be used and washed over and over.


Enjoy looking! I have some more gift bags ready to go into my shop next week! 

   photo Blogsignature2smallersizeforblog_zps20ad3d10.png

Thursday, October 16, 2014

Moving has taken "it" out of me........

Oh wow..... we finally got moved to a "new" rental and I'm sorry to say, I've kind of lost my creative spirit for awhile! I've been so busy packing, moving, unpacking, organizing and "where did I put this?".... ing... that my blog has taken back seat. so sorry.............


So for now, I'm going to show you some of my FAVORITE photos from one of my most FAVORITE blogs of all time!  The blog is by Helen Philipps, and I just love her creativity, bright colors, gorgeous whimsical fabrics, and awesome sewing and crocheting talents.

Here are some more of her projects:


I just swoon every time I receive one of her blog posts! Love love love her. Go check out her blog. She'll refer to where she purchased her DARLNG fabrics.

So until I get back into my crafting, and finish getting my new rental house in order, I hope you are satisfied with some of my favorite blogs and past photos I've placed here on my blog. I promise, I will get back to blogging very soon!

Miss you guys!

 photo Blogsignature2smallersizeforblog_zps20ad3d10.png