Photo of my and signup.
Thursday, June 27, 2013
SOME PRODUCTS RETIRING AT THE END OF JULY.
If you aren't a Close to My Heart Consultant, then you don't know that some of our products are retiring at the end of July, 2013, to make room for our NEW AUTUMN/WINTER 2013 IDEA BOOK products!
It is sad (sigh.....) to see some of the products go, but it is also exciting to anticipate the new things that are coming! I will miss them. I wish we could get everything all of the time!
We CTMH consultants are so excited! The Close to My Heart Convention is going on right now in Florida, and many consultants are attending (not me). On June 27th, the new Autumn/Winter 2013 Idea Book will be revealed to the consultants attending the convention. (And I am going to be following many blogs to get sneak peaks of the new things being introduced in the new Idea Book!)
Non-consultants will be able to view the new Idea Book online at my website on August 1st! I may show some sneak peaks before then.
There are usually 7 to 8 new paper packs in the new Idea Book! How exciting! I can hardly wait!
Four of this season's paper packs will be carried forward. They are:
Tommy - seen HERE.
Chantilly - seen HERE.
Surf's Up - seen HERE.
For Always - seen HERE.
Phew...... the Chantilly textiles and For Always textiles, and Drawstring muslin bags, three of my favorites, will be carried forward to the new Idea Book! .........so glad. Here is a canvas wall hanging project that I made using the textiles, and HERE is one of my stamped, cute muslin bags.
For a list of the CTMH retiring products, go HERE. If there is anything you have on your wish list that you just can't live without, be sure to get it before July 31st! All of these are WHILE SUPPLIES LAST, so once they're gone, they're gone. (Boo Hoo). I'm always sad to see old favorites go.
But then the new products appear and I'm happy again!
I'm hearing that Close to My Heart is introducing some brand new, ground-breaking designs!
Tuesday, June 25, 2013
SOME PATRIOTIC CARDS.
As you know, Close to My Heart has this great promotion going on during June and July, 2013. See my post Let's Get Patriotic here. CTMH will donate $3 to $5 for each stamp set purchased, to either the USO or a Canadian military support fund.
I found some AWESOME and I mean GORGEOUS cards made by K. Aaron Brown over at Booth #32. She is so talented and I asked her if it was OK to share her cards. She said go for it! So here they are. She has given me such great ideas!
This card was "loosely" lifted from a card Aaron found on Pinterest, from Just Give Me Stamps. I like how Aaron used alot of our Kraft Cardstock on her cards and did background stamping on it. She may have used our Kraft Die Cut Cards and Envelopes on a couple of her cards. Unfortunately, they are RETIRING at the end of July! Darn, I love those Kraft Cards. All the other Kraft envelopes are also retiring at the end of July. |
Looks like this card was inspired by a card featured on Peppermint Patty's Papercrafts. It is pinned to Aaron Brown's Pinterest board. This card is using the CTMH Home of the Brave stamp set. |
Aaron used our darling Honeycomb stamp set on this card. Love it! |
I love how Aaron stamped on white cardstock and then cut out the image. And I love how she cut out the rays and embossed them, and then stamped over the embossing to give a distressed look. |
Plus, by purchasing one of these stamp sets, we are doing a little part to help our military by the donations CTMH is making.
Happy creating!
Labels:
cards,
donate,
Patriotic,
retiring products
Friday, June 21, 2013
PAPER ROSETTES TUTORIAL - FINALLY!
Paper Rosettes Tutorial - about time! I've been promising this for awhile now so thought I'd better get to it!
These are so fun and ADDICTIVE to make. Once I get started, I just can't stop.
There are alot of tutorials on YouTube and that's where I first went to learn how to make them. Everyone I watched was about the same, until the end part where you have to smoosch (is that a word?) it together and glue it. That was the hard part and after many tries, I figured there MUST be an easier way!
And I did come up with an easier and simpler way to make them. I was pretty proud of myself.........
patted myself on the shoulder and thought I was a real wizard!
Alas!............ my balloon has been popped. Just the other day, I was on YouTube browsing, and saw a rosette tutorial. I thought I'd watch it just for fun, so I could watch the person struggle with the final gluing steps and get a good giggle! But low and behold........... SHE was using MY secret! One catch though.. she had posted her video about a year ago. Phooey... I guess I'm not the only smart one out there. Someone else had thought this up too
Well, here goes anyway. There are alot of photos so be patient!
A note here, if you just want to make one rosette, you only need one strip of paper. To start, I would suggest a 1" strip, and score it every 1/4" per my above instructions. This is great if you want to use up your scraps!
Now for the fun part!
Now you ask? what do I do now? how do I glue this thing? That was my initial dilemma! Some people put a bunch of hot glue in the middle and try to let it dry.. (doesn't work very well).... some people try to glue a little circle onto it by holding it with one hand, gluing the circle with the other hand, and then putting the (by then dried hot glue) circle on top.... NOPE doesn't work! the whole thing just pops up and you fight with the strands of hot glue or the glue drying too fast. Any other glue doesn't hold and the thing ends up popping up anyway!
This was VERY frustrating to me! The gals on the YouTube videos didn't seem to have too much trouble, but I'm sure it took lots of practice before they got it right.
Now for my secret (well, I thought it was mine!). Oh... and you can let the rosette pop up while you do this! Once you do this, you are good to go for all of the rest of your rosettes, forever and ever.
I had to play around with different lid sizes for the different sized strips that I cut. I now cut my strips to match the lid size. I looked around the house forever to find the size lid (above) from my teapot, to fit my 1-1/4 or 1-1/2" rosettes!
I find that a prescription bottle lid works great for a 3/4" strip. A vitamin bottle lid works good for the 1" strip, but I found that it's a little small for the 1" strip, so I cut my 1" strips at 7/8" rather than 1 inch. It's just a matter of trial and error.
THAT'S MY GREAT SECRET (I thought it was mine... oh well) and it works so wonderfully that I just couldn't stop making rosettes!
Add any sort of embellishment you want to the middle. I like buttons. There are so many fancy ones out there. Sometimes I put a gem on top of the button, or you can add a little bow of twine.
I've cut two different size circles, glue them together, glitter the edge and then use it instead of a button. Works great. I've also found a YouTube video for making your own buttons! Search for recycled buttons. I'm going to try making some of those!
You can ink the edges of your strip before or after the rosette is done. I like inking it afterwards, and I can also ink some of the folds.
You can also punch the edge of your strip before folding, with little holes, or use an edge punch to make it really decorative!
HOPE YOU ENJOY THIS and have fun making your paper rosettes! Let me know if you have any questions.
There are alot of tutorials on YouTube and that's where I first went to learn how to make them. Everyone I watched was about the same, until the end part where you have to smoosch (is that a word?) it together and glue it. That was the hard part and after many tries, I figured there MUST be an easier way!
And I did come up with an easier and simpler way to make them. I was pretty proud of myself.........
patted myself on the shoulder and thought I was a real wizard!
Alas!............ my balloon has been popped. Just the other day, I was on YouTube browsing, and saw a rosette tutorial. I thought I'd watch it just for fun, so I could watch the person struggle with the final gluing steps and get a good giggle! But low and behold........... SHE was using MY secret! One catch though.. she had posted her video about a year ago. Phooey... I guess I'm not the only smart one out there. Someone else had thought this up too
Well, here goes anyway. There are alot of photos so be patient!
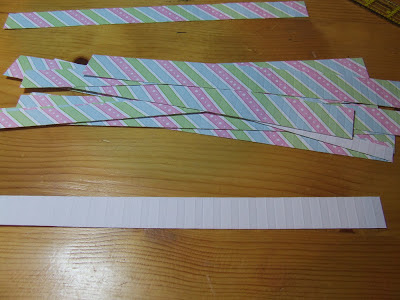
I use a 12x12 sheet of paper. Light or medium weight is good. It can be one sided or two sided. Heavy cardstock works but sometimes is harder to do the folds. |
First, I score the paper every 1/2 inch. NOTE, if you just want to do one rosette, use a 1" x 12" strip instead of a whole sheet. |
Then turn paper over and score in between the half inch scores, so the final paper is scored every 1/4". It seems to fold easier if you do it this way instead of scoring every 1/4" on one side. |
A note here, if you just want to make one rosette, you only need one strip of paper. To start, I would suggest a 1" strip, and score it every 1/4" per my above instructions. This is great if you want to use up your scraps!
As you fold, I like to be sure the folds are crisp and flat, so every few folds, I kind of push down on the entire little accordian. |
When all done, really press it all together and try to do it so the folds are all pretty even. As you go, you may have to tweak some of the folds to keep them even! |
Here's the finished strip. You can now lay it down and let it unfold. It won't pop out very far if you've made the folds nice and crisp. |
Now cut off one of the ends. It doesn't matter which one. |
See? like this....... |
Try to cut it off right at the fold (not like me.. I kind of messed this one up!) I trimmed off that little bit left to the right of the fold. |
See here where I joined it? You can't even tell where I joined it and that's the way you want it. |
Here's your joined strip - forms a circle. |
You've got to SMOOSCH it down! Kind of press everything down on the inside of the circle. It will then lay flat, like the below photo. |
You need to scrunch it up so the center hole is really small. |
This was VERY frustrating to me! The gals on the YouTube videos didn't seem to have too much trouble, but I'm sure it took lots of practice before they got it right.
Now for my secret (well, I thought it was mine!). Oh... and you can let the rosette pop up while you do this! Once you do this, you are good to go for all of the rest of your rosettes, forever and ever.
I had to play around with different lid sizes for the different sized strips that I cut. I now cut my strips to match the lid size. I looked around the house forever to find the size lid (above) from my teapot, to fit my 1-1/4 or 1-1/2" rosettes!
I find that a prescription bottle lid works great for a 3/4" strip. A vitamin bottle lid works good for the 1" strip, but I found that it's a little small for the 1" strip, so I cut my 1" strips at 7/8" rather than 1 inch. It's just a matter of trial and error.
THAT'S MY GREAT SECRET (I thought it was mine... oh well) and it works so wonderfully that I just couldn't stop making rosettes!
Then place the glued circle onto the rosette and hold for about 5 seconds, while pressing down quite firmly. |
You can easily remove the rosette from the lid using your tweezers. |
And there you have it! Your rosette is solid and glued like a rock and won't come undone! |
I've cut two different size circles, glue them together, glitter the edge and then use it instead of a button. Works great. I've also found a YouTube video for making your own buttons! Search for recycled buttons. I'm going to try making some of those!
You can ink the edges of your strip before or after the rosette is done. I like inking it afterwards, and I can also ink some of the folds.
Add some glitter to your edges if you want to. I love the look! |
HOPE YOU ENJOY THIS and have fun making your paper rosettes! Let me know if you have any questions.
Labels:
My Tutorials,
rosettes,
tutorials
Monday, June 17, 2013
MILK CARTON REPLACES FREE BANNER.
Hi all, NOTE, THIS ITEM IS SOLD OUT!
Just a quick note. On my post of June 3rd (Make it a Banner Day), I promoted the free mini banner with your order of $25.00 or more. Well, low and behold.. that banner is gone! They flew out the door last weekend!
Close to My Heart is graciously replacing the free banner with a set of TWO darling My Creations Milk Cartons FOR FREE! NOTE: THIS ITEM IS SOLD OUT! I'm not sure whether CTMH will offer another free item in June. I will let you know or contact me!
Here are a couple of sweet ideas for the milk cartons.
From Close to My Heart:
Have fun!
Just a quick note. On my post of June 3rd (Make it a Banner Day), I promoted the free mini banner with your order of $25.00 or more. Well, low and behold.. that banner is gone! They flew out the door last weekend!
Close to My Heart is graciously replacing the free banner with a set of TWO darling My Creations Milk Cartons FOR FREE! NOTE: THIS ITEM IS SOLD OUT! I'm not sure whether CTMH will offer another free item in June. I will let you know or contact me!
Not very exciting plain like this, but so CUTE when decorated! See below. |
Here are a couple of sweet ideas for the milk cartons.
Compliments of Sara Batkin at her blog. |
Not too soon to start making your Christmas gifts! Compliments of Annette at Annette's Creative Journey. |
From Close to My Heart:
All you need to do is place a $25.00 order on my WEBSITE which includes a stamp set, and this darling set of milk cartons is yours for FREE! Get these while supplies last.Please note that the Milk Carton is also in limited supply and we do not anticipate it remaining in stock for the duration of June (2013). We encourage you to communicate this to your customers and place any outstanding orders within the next few days. The Milk Carton item will be available on orders placed beginning immediately.
Have fun!
Labels:
CTMH Specials,
free stuff,
last call
Sunday, June 9, 2013
LA PINE RHUBARB FEST - FUN DAY!
Our little town of La Pine, Oregon had their annual Rhubarb Festival yesterday. I'd never been, as we just moved here last Fall, but was anxiously waiting for it. I decided to have a little vendor booth with some of my handmade items and Close to My Heart Idea Books. We also displayed some of my husband's books that he wrote a couple of years ago (Making a Case for the Right Rifle, Who Can Own Just One?). (Here's his blog, rwmcleod.blogspot.com if you know anyone who likes to hunt and/or has a love of the older style rifles. His book is a really easy read and great for the experienced hunter/shooter or someone just starting out.)
The Rhubarb Festival is put on by L&S Gardens in La Pine and it was an amazing event! I'm sure there were over 1500 people who attended! L&S Gardens is south of La Pine is kind of old westy (is that a word?)........... really neat with old buildings and lots of old farm and gardening implements.
Here's the part of our booth with my crafty stuff. I forgot my camera... darn! I would have taken tons more pictures. You know me and cameras. So I just took a few with my cell phone, which is old and doesn't take very good pictures.
Here are some of the things I displayed: (UPDATE JANUARY, 2014 - many of the items shown here are now in my ETSY SHOP, My Pink Paper Cottage.)
I thought these would fly off the table! but didn't. People exclaimed how cute they were but no buyers! Oh well.. I love them anyway!
I had lots of tags, all packaged up so cute.
What I LOVE about this tag and some others I made, is that I used some scraps of Pendleton wool that I found at a flea market in Bend... and I cut little pieces to use on the tags. I think it turned out really neat. Oh... I also used the zip strips from the Dakota papers for the different sayings, such as "Country Pride", "Cowboy Cool", "Back in the Saddle Again", etc.
Here are some holiday tags I made. One gal bought several as she said her and her husband's anniversary is on the 4th. They are so perfect to "celebrate" their special day.
I did NOT used CTMH papers for these tags. I purposely bought some blue and white glitter papers and the neat buttons knowing I wanted to make some 4th of July tags. I had no idea how to design these, I just started playing with shapes I had cut out with the Cricut and the striped red, white and blue paper I found on sale at JoAnn's! I didn't have any good blue CTMH cardstock or even any red. The little silver glitter stars are made using our wonderful, gorgeous silver glitter paper. I love it and hope we get more colors in our next catalog.
I displayed all of my items in little cello bags I found at a scrapbook store in Newport, Oregon when I was there a few weeks ago. Glad I had them! I used the woodgrain Dakota paper for the background of most of my packaging, and I love the look! I had alot of comments on that paper. If you love western stuff, be sure to get some before the end of July! I bought a bulk pack of the 24 sheets of just the woodgrain, because I love it so much. I may even get another bulk pack!
Here is my packaging:
I plan to put a rosette tutorial on here soon, showing my little secret.
It was a long day (and HOT - around 90 degrees) but I had fun. Didn't do great selling things, but a couple of ladies bought Idea Books and a few things, and several took my business cards. You never know when that one person who takes a card may become your best customer! Many people asked "what do you use those rosettes for?". I was surprised! Next time, I'll have put out samples to show how they are used.
I've never done a vendor booth with my CTMH business. I didn't really want to be making things or do make and takes. (I was worn out from making stuff!). I just wanted to get my cards and catalogs "out there".
Well.. that's how I spent my June 8th! How did you spend yours?
The Rhubarb Festival is put on by L&S Gardens in La Pine and it was an amazing event! I'm sure there were over 1500 people who attended! L&S Gardens is south of La Pine is kind of old westy (is that a word?)........... really neat with old buildings and lots of old farm and gardening implements.
Their little general store. |
Here's the part of our booth with my crafty stuff. I forgot my camera... darn! I would have taken tons more pictures. You know me and cameras. So I just took a few with my cell phone, which is old and doesn't take very good pictures.
I had a sign-up sheet for my blog, flyers, Idea Books and some Studio J layouts. |
DARLING little Muslin Bag stamped with the retired Quick Card - Shell and "Thanks". I put candy or treats in some of the bags. |
Another muslin bag with the Cozy Cat stamp. Isn't it darling? I put glitter glue on all of the stamps. |
I had lots of tags, all packaged up so cute.
I used our Dakota paper for the background (retiring I think at the end of July - boo hoo). And used a strip at the bottom of our Buzz & Bumble bulk papers (also retiring at the end of July) to add the orange color. |
Here are some holiday tags I made. One gal bought several as she said her and her husband's anniversary is on the 4th. They are so perfect to "celebrate" their special day.
I did NOT used CTMH papers for these tags. I purposely bought some blue and white glitter papers and the neat buttons knowing I wanted to make some 4th of July tags. I had no idea how to design these, I just started playing with shapes I had cut out with the Cricut and the striped red, white and blue paper I found on sale at JoAnn's! I didn't have any good blue CTMH cardstock or even any red. The little silver glitter stars are made using our wonderful, gorgeous silver glitter paper. I love it and hope we get more colors in our next catalog.
I displayed all of my items in little cello bags I found at a scrapbook store in Newport, Oregon when I was there a few weeks ago. Glad I had them! I used the woodgrain Dakota paper for the background of most of my packaging, and I love the look! I had alot of comments on that paper. If you love western stuff, be sure to get some before the end of July! I bought a bulk pack of the 24 sheets of just the woodgrain, because I love it so much. I may even get another bulk pack!
Here is my packaging:
I plan to put a rosette tutorial on here soon, showing my little secret.
A made quite a few paper flowers. I love these and they are so easy to make. Make a comment or email me if you are interested in learning how to make these. They look so real. |
It was a long day (and HOT - around 90 degrees) but I had fun. Didn't do great selling things, but a couple of ladies bought Idea Books and a few things, and several took my business cards. You never know when that one person who takes a card may become your best customer! Many people asked "what do you use those rosettes for?". I was surprised! Next time, I'll have put out samples to show how they are used.
I've never done a vendor booth with my CTMH business. I didn't really want to be making things or do make and takes. (I was worn out from making stuff!). I just wanted to get my cards and catalogs "out there".
Well.. that's how I spent my June 8th! How did you spend yours?
Labels:
daily life,
handmade flowers,
muslin bags,
shabby
Subscribe to:
Posts (Atom)