Photo of my and signup.

Photo of my and signup.
If you want to subscribe to follow me via Mail Chimp, the signup is in my sidebar or at the bottom of my posts.

Saturday, July 29, 2017

Quick and easy cards (again!).......

Every now and then I just get a bee in my bonnet to make some really quick cards.. just for the heck of it.. and of course, it always "inspires" me when I NEED some thank you cards after my birthday or Christmas! (and I just had my birthday in late June, so was in need of thank you cards). I do have some pre-made thank you cards, but I wanted to use my Sizzix dry embossing machine, so I lugged it out and played. It's always fun to make something new.


I love the look of embossed papers. Isn't that pretty (below)? I used a floral embossing folder and ran it through my Sizzix machine using some pre-cut 3-3/4" x 5"  pretty free digital (rose gold) papers that I printed onto white cardstock, compliments of Free Pretty Things for You. I LOVE her beautiful digital papers. She offers free papers, and also has some you can purchase in her Etsy store.


I already had some colored card bases, so all I needed to do was cut my papers to size, leaving a 1/4" border, and then run each one through my Sizzix. Behind each "matt", I put a doily that I had cut in  half, just for a little interest. And voila! Here's what I came up with:

White gold rose on dark puple.

I added some clear Stickles glitter to the leaves and a few of the roses.

Palest of blue gold roses on a white card.

Light pink and gold roses on pink card.

Sorry about my name! It looks like Greek! I doubled over it with my watermark but was too lazy to redo it......tsh... tsh. this was a cream gold rose on purple card.
To do something different, I used a kraft card and envelope, and some pretty kraft paper for the matt that had this foiled dark pink/purple. I didn't emboss this one and added a polka dot paper I had behind it, for a little  pop.  The metal flower came from my son's girlfriend. She makes jewelry, and for my birthday she sent me a box of all sorts of bling and flowers and parts of old jewelry, etc. What a thrill to get that! This thank you card actually went back to her, with one of her pieces of bling on it.


On each envelope, I gussied it up with a strip of matching paper (except on the kraft envelope). The little labels I made using one of my label cutting dies, and then stamped the words on it with Onyx black Versafine ink. Wanted to keep it simple, right?

As usual, my "quick and easy" cards took me a little more time than I had planned, but I enjoyed every minute I spent wrapped up in my little world of papers and ink, scissors, embossing, and glitter!

OTHER STUFF..............

Yes.. I had my birthday on June 29th and it was a fun and special day.... only my hubby and me..... but my 3 sisters, and my son, called me, and I had gifts to open in the morning, afternoon and evening (most came by UPS and most were things from my Amazon.com wishlist!) I love having a wishlist on Amazon!


The gift bags from Amazon were beautiful!


Got the book Sewn Gifts, from Helen Philipps, that I've been wanting forever (thank you sister)!! She has the most awesome blog..... full of color and delight, and sewing, and crocheting, and gardens........ is published in magazines and has published these wonderful books.  She's such an inspiration to me. She lives in England and I so enjoy her. Take a peek at her blog here.


I also received her other book (thank you again sister!) entitled Patchwork Gifts. I'm just swooning as I look through these books. I want to make everything!  I also received Mollie Makes Crochet, another wonderful book that I've been wishing for.


My sisters definitely KNOW how much I love pink!


And to top it all off.... hubby made me dinner and the most wonderful gluten free, homemade prune cake with white buttercream frosting! My mom always made me homemade prune cake on my birthdays, for many years.  What a nice end to a fun and special day......

It's hotter than heck here and this coming week going to be above the 100's. That's when I stay inside and craft and bake!

Happy weekend!

   photo Blogsignature2smallersizeforblog_zps20ad3d10.png

Wednesday, July 26, 2017

Coconut Flour (gluten free) Pumpkin Mug Cake - Yum!

Lately, my husband has been on a recipe kick... searching the internet and cooking sites for paleo and "ketogenic" recipes, that are also gluten free for me. 


In between my busy life and some travelling I've done lately, I just HAVE to take time now and then to bake a little bit. And that evening, I was really craving something sweet, and yet fairly healthy,.... and quick!

As I flipped through the recipes he had printed for me, I found this Coconut Flour Paleo Pumpkin Mug Cake on LowCarbYum that looked interesting to me, as I love pumpkin! So I tried it. All I can say is YUM... QUICK... FAST....EASY... NO MESS... AND YUM!


I mean in probably 8 minutes I was savoring that sweet, soft, cake-a-licious treat! I gathered the ingredients (not that many).... beat the eggs in a little bowl.... dumped them and everything else in the mug, mixed with a fork, and popped it into the microwave for 3 minutes! Done! let cool a few minutes, dump out, sprinkle with powdered sugar........... and eat! YUM.

Mix it up............

Nuke it.............

Pop it out of the mug............
It was good! Did I already say that? The texture was exactly like a cake... moist, spongy and very tastey. And what did I have to clean up? One small bowl....a fork and spoon... and the mug. 

I cut it in half and was going to be good and only eat half........ well, that didn't last very long. It was all gone within a half hour!  I didn't happen to have coconut flour, so I used a gluten free flour mix that I usually have on hand. It would be great with coconut flour too. And no oil or butter in it!

Two hefty morsels.............


Here's the recipe from lowcarbyum.

COCONUT FLOUR PALEO PUMPKIN MUG CAKE

INGREDIENTS:

3 tbs pumpkin puree (you could probably use smashed bananas or applesauce-it called for only tbs of the pumpkin but I used 3 tbs)
2 tbs coconut flour (I used a gluten free flour mix)
1 egg beaten
1 tbs coconut milk
1/4 tsp baking powder
1/2 tsp vanilla
1/4 tsp Sweet Leaf Stevia extract
1/2 tsp pumpkin pie spice (I added some extra cinnamon too)

INSTRUCTIONS:

Beat the eggs and milk in a small bowl. Then add them with all other ingredients into a mug or ramekin and blend well with a fork. (I used a larger than normal/heavy duty mug).

Microwave on HIGH for about 1-1/2 to 2 minutes until toothpick placed in center comes out clean. (I had to nuke mine for 3 minutes)

Remove from the mug if desired.

Serve warm with whipped topping or powdered sugar. (coconut cream makes it paleo friendly).

Calories: 89
Total fat: 5.1 gr
Cholesterol:  82 mg
Sodium: 49 mg
Dietary fiber: 3.2 g
Sugars: 1.6g
Protein: 4.1 g

I'm going to also try this with applesauce. My hubby doesn't care for pumpkin, so will try applesauce for a nice little spice cake.

Try it! You'll love it!


Friday, July 21, 2017

Yard changes......

Since my last post on June 14th, (you can see it here), about the big stump in our front yard, things have changed alot! 

My June post showed how I worked around the stump adding some interest to the rock garden and stump that was left when our front tree blew down. I added the bird bath and the shepherd's hook with hanging flower pots.  It looked so pretty!  But I knew it would change soon!

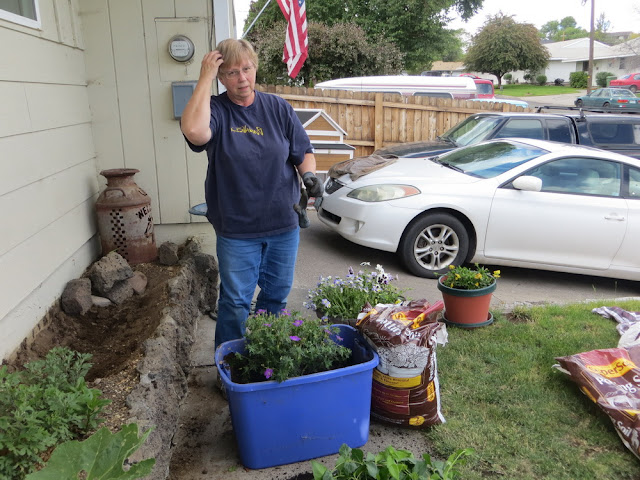
Before the stump could be removed, hubby and I had to dig up ALL the flowers there and put them into tubs, and move them to our backyard to live there until the rock wall on that side can be replaced. The roots from the tree that fell pushed out and broke the rock wall, and thankfully our Homeowner's Insurance covered it!


There was alot of digging and replanting into the tubs and I used at least FIVE big bags of potting soil. Oh what a mess and was hard work.


I figured the plants and flowers could live in the tubs until the front yard is all done again, and then we could move them back and replant them! 


We also lugged all the rocks from the "rock garden" over to the end of our front house raised flower bed, as I had removed almost all the plants there because of EARWIGS EATING THEM!


Here's all the tubs moved to the backyard. They look kind of wilted here, but they all survived!


OK... now that work is all done.. so the guys can come in and take out that stump!


Even that big lilac got moved! Hated to see it go. It hid those garbage cans in the neighbors' driveway. 

The owner of those pesky garbage cans... gr.r.r.r.r.r

Looks so naked without the lilac. And oh joy... now I can see those garbage cans!
 I hated seeing that lilac go. The guys moved it to our backyard and "toed" it in some dirt. Hopefully we can split it and put part of it back out front, and the other half somewhere in our back yard.

Maddie is wondering what happened! She loved that lilac to hide under and chase the birds there.
New home for the lilac in the back yard:


I actually kind of like the lilac there as a "backdrop" for the other flowers, etc. But..... they toed it in crooked and the roots are too close to the surface, so it wilts really fast... AND..... they plunked it down in our future pond area! This house had an area dug out with cement sides, which will be perfect for my pond (and fountain) by the garden. So lilac has to go somewhere else!

OK.... so now we are left with that totally flat surface out front. Here are some photos of the rock wall that cracked and pushed out.. and it all has to go, very very soon. (The plan is for around August 1st).

This is the side rock wall that cracked really bad and needs replacing.


This is the taller rock wall along the front of our house yard, that was pushed out further (it already had a small crack in it). We are going to have that entire wall replaced with tiered railroad ties.


Front house rock wall that will all be replaced (below). There's the dead tree that came down!


Here's an idea of what we want for our tiered wall:


I had a plan for the flat area of our front yard. Even though I knew this was a temporary fix, I wanted it to look nice and yet be easy to "undo" when the time comes for the walls to be replaced. I wanted some bright colors and flowers......... so I proceeded to paint!

That old "free" bench I got from the neighbor got all dressed up.

Before................
Old brown pot got a new dress!

Love this color of pink... I think I went overboard with it. Oh well...........
Pink pot inside the blue birdcage (also a freebie from the neighbor).

This old pot got a new coat of white.
OK... painting done. Now for the reason I wanted that rock garden gone.. and all the rocks moved, etc. I wanted a FLAT surface so I could walk out of my side gate (to the left of our front door as you look at the photos) and right onto my yard. With the rock garden there, I had to walk up onto the (high) stoop, and then walk down two steps, every time I wanted to walk from the gate into the yard. 

It got very tiring because the faucet that the hose was attached to was at the side of the house, behind that gate, way in the back! You know how it is when you need to adjust your sprinkler on the lawn, and you walk back and forth to the faucet to turn it up or down? Well... after doing that about 10 times (up and down, up and down, up and down), it got to be very tiring.  And yes I know.... I know....... good exercise right? But.. it was just one of those things that was very aggravating to me! I wanted it flat right there, and even if the tree hadn't fallen, I was planning to move that entire rock garden out of there.


I was so happy to have this flat area to work with! And those neighbors' garbage cans.. another "thorn" in my side.... but what can I do about it? Nada. They are ALWAYS THERE. All of my photos that I've taken of this area have the good old garbage cans in the background. Very maddening. Any ideas to hide them???? There's actually some steps down to their driveway from a flat cement area right there, so can't really plant shrubs right there...  hubby likes to walk next door and have a pipe smoke with the neighbor! I'm thinking maybe some sort of a partial lattice fence along there??? with a gate through to the neighbor's (that I can keep shut!)... with some sweet smelling vines?

Like this..... 


Or this................... with some vines growing up.
I guess I didn't take photos of me working this new flat area. I first raked and smoothed it all out and got all the little rocks out, then dug down about 3 inches and made sure it was level (more raking). I then bordered the sides with 2x4's standing up on end, to keep an edge there and keep the mulch in. I covered the depressed area with landscape cloth, and then filled it with about 3" of a darkish bark mulch. I really liked the results.

Next came planting a few more pots of flowers, putting the shepherd's hook back with my hanging plants, re-situating the bird bath (which I notice is a little crooked!), placing a few rocks below the hook to hold it steady in the wind, and placing the garden bench just right! It helped to make that area not look so naked and bare.

And voila! here it is..........


There's the side house gate... I can now walk from the side of the house where the faucet is, right onto the front lawn!  No more up and down, up and down............ Happy girl.

Hum.m.m.m. wonder if I should paint the bird bath..............????
And this can all be moved relatively easily... for when the guys come to replace the rock walls. I'm sure I'll have to redo the mulch area but that's OK.  It only took me two trips to the chiropractor a 5 hour drive away, to repair the damage I did to my neck and back with all that raking and digging and lifting! such is life................


   photo Blogsignature2smallersizeforblog_zps20ad3d10.png