Sunday, May 28, 2017

More eye candy.....itty bitty boxes.

I've been busy! Made a whole bunch of tiny little gift boxes.  They are addictive!  They are fun! They use up by 6x6 papers from my overabundance of many pretty paper pads!  Each one is unique. Each one is a little work of art. Why did I make so many you ask?

To make a long story short. At Easter, my son and his girlfriend were here. I made each of us a tiny little box holding a sweet treat. She loved them! She is the one in Astoria, Oregon who has the gems/rocks and jewelry store, Terra Stones. She asked if I could make her some for her shop, to use as little gift boxes for when someone purchased small rocks or jewelry. 


Easter treat boxes.
I... without thinking too hard on it.... said sure! She wanted about 20. I made 26... couldn't stop myself.  I don't think any two are exactly the same. I made all colors.... even some masculine ones, and I loved using my two sided papers with the little flap on the sides showing the reverse side of the paper. 


See the different colored flaps on the sides?  Such fun! I LOVE color.
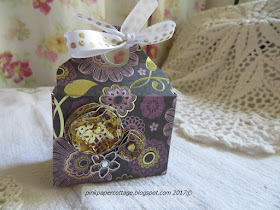
They are so tiny, 2" x 2" by 2-1/4" tall... can be held in your hand like this.  I love tiny things!


....... and this...........


And I forgot to tell you.... I made these using the We Are Memory Keepers Envelope Punch Board. It's a tool I can't live without! Besides making your own custom envelopes, you can make all sorts of tags and boxes. Love it! There are MANY video tutorials on YouTube showing you how to make these boxes and many other fun projects.

The little boxes are tied on the top with a ribbon......  (of course I just HAD to go to the store to buy MORE not-needed much needed ribbons!


I put word tags on some, and then decided maybe I should leave the tags off.... so instead I stamped a bunch of words, cut them out with my decorative scissors and put a little double sided tape on the back, so the person using the box could choose the word they wanted to stick on the box (if they chose to). I packaged those up in a cello bag.

So here come the pictures!


I used 3 dimensional stickers on some...... sticky back pearls and gems on some most of them, as I have to have a little bling everywhere.....


Who doesn't need some owls????????


Manly things... gears and padlocks.........


A few animals for kids (and adults?).........


I think this one was my all-time favorite.... love the burgundy and gold papers.. and I made the little  scrunchy flowers....


The white flower on the left was one I pulled off of a Dollar Tree bunch.... and then added the glitter to the leaves......... love it........... more bling....


Another Dollar Tree bloom (above).... and glitter of course..... 
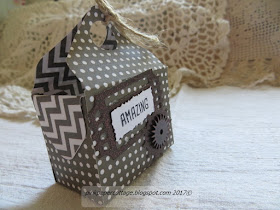


A "guy" thing.........
So they're done and shipped off to Astoria! Amazing how something so small can give me such pleasure! I'm ready to make more.... isn't that crazy? 

   photo Blogsignature2smallersizeforblog_zps20ad3d10.png

Thursday, May 25, 2017

Old to new!

After making my neat little "recycled" western (skirt) tote bag, I decided to try making one with some old denim. I was very inspired by Connie at Crafty Home Cottage to use some of my own bits and pieces of denim. She made the CUTEST aprons using her old bib overalls! Check them out at her link above.

But, instead of using my own scraps,  I decided to go to the thrift store and buy an old denim skirt! I just HAD to try using a short denim skirt to make another tote bag, like my old western skirt tote (left, and linked above)............my sister's birthday was coming up and I thought it would be perfect for her.

So off I went to the local thrift store!


First though, I must apologize for the poor photos. I made this bag right before a beach trip to celebrate my sister's 60th birthday (did I ever post those photos?), and was in a hurry to get it finished before I went (I ALWAYS wait until the last minute)...... so naturally, I forgot to take photos of it! That's just not like me........but being in a rush does do weird things to a person, right?  So....... the following photos were taken by my sister with her cell phone, and though OK, they don't really show the details. 

Front of bag (above) hanging from a chair. Quite blurry but you get the gist of it. All I did was sew up the bottom seam (after sewing on the trim fabric with my sewing machine).  I used some darling Parisian-type fabric for a trim around the bottom, front and back, and for a "patch" behind some vintage doilies and buttons I had for decoration.

I didn't do anything else to "alter" the skirt at all! I left in the zipper and snap and the belt loops. I did add two more belt loops, one on each side, using the strip of denim that I cut off the bottom before adding the fabric trim.

Better picture of front of the bag, although blurry. Darn! I used some pretty pink stripped fabric for the tie, that was woven through the belt loops. The strips started out at 3" wide by a length that would go around the waistline of the skirt, plus maybe 3 extra inches. I then turned in the edges of the strips to enclose the raw edges and finished off the ends. The ties were run through the belt loops, and it can be pulled open just like a drawstring bag.

I made a "patch" using the Parisian fabric with some old vintage buttons across the top (just for decoration).

All of the lace sewn along the pocket tops was hand sewn as I couldn't reach inside with my sewing machine. 

Closeup of the front (above).
The back shows the trim around the bottom much better. Just love that fabric! My sister loves Hello Kitty things and colors, so I figured she'd like this fabric with the pinks, turquoises and blacks. The lace was hand sewn and also the appliqued heart was sewn on by hand.

I hadn't planned to make this tote so fancy, but you know me, I just can't resist adding lace and doo-dads.

I didn't even take pictures when she was opening this gift! What was I thinking anyway???

Thank you Connie at Crafty Home Cottage for your inspiration!

   photo Blogsignature2smallersizeforblog_zps20ad3d10.png

Saturday, May 20, 2017

Saturday Serenity - May 20, 2017

What is serenity anyway? A feeling of calm? A feeling of peace? A feeling that all is right with your life? No worries? no stress?   


Whatever is lovely..
Think about such things.
Philippians 4:8

I am feeling somewhat serene today....... I think it's because I finally have a few flowers to gaze at.

What is "serenity" to you?


   photo Blogsignature2smallersizeforblog_zps20ad3d10.png

Monday, May 15, 2017

Tiny notebooks.......

Well.... my sad yard is still sad.. but not quite so sad.... I've managed to work out there a little bit and pulled and cut and broke off all of the dead stuff from last year! We also took bags and bags of yard debris to the dump. How exciting! More on that later...........


Lately though, I've been on a roll making little notebooks... yes.. little books to hold notes.... first I made some just for me, and then I decided they were so handy, I'd make a few for gifts.  See the one on the far right with the pink flowered washi tape? That was my first little 'wing it' project that I made several months ago. I was just playing. I've already filled up the inside with my most favorite "go to" projects!  I was always digging through my pile of notes or trying to find the item I wanted to make on YouTube.. now I have them in my handy dandy "note" book.


I even added tiny photos of the finished project on some of the pages!


For this little booklet, I just cut a bunch of white cardstock into 3-1/2" by 5-1/4" pieces, made two little covers and put it all together with brads. so easy and durable. The heavier cardstock holds up really well with all the use it's getting. I printed out my directions on the computer, sized to fit each page, and then glued them onto the pages.

Now to move on to something a little fancier! You know me... I can't do "plain" and "simple". I found a really cute YouTube project from Scrapbookingwith ME entitled Mini Album Card which, to me, is not really a card, but is a little booklet that is super easy to make and has a few pages that I decided I could add pockets to in order to hold more notes.

So here's my first attempt at her little "card"... this one was for me.. for more of my favorite notes and project details:


I used one of my pretty pieces of cardstock (you only use a 6" x 12" piece) that I've been hoarding for years!  I added pockets to the pages (a little 1-1/2" by width of the booklet, glued onto the bottom of the pages). I slipped in many pieces of computer paper to write my notes on...... and added a few pretty tags here and there "just because" I love tags!


My next booklet.. just for "me" mind you.... I made a little taller and thinner. These card/books have 3 basic hinges where you add one piece of pretty heavy designer paper, but on this one, I added extra paper to each hinge.. so instead of 3 pages, I ended up with about 9 pages.. plus I added a few sheets of lined notebook (leftover) paper into the hinges also. This was one is plumb full of blank note papers to write on. Love it....


I used up a bunch of some of my old scrapbook papers that I've had in a pad I bought probably 6 years ago. I'm TRYING really hard to use what I have.. use up my scraps... "use it use it use it". That's my new mantra.

So for gifts, I made a little notebook for my sister who loves to sew and quilt:


This one has an elastic "belly band" to hold it closed, as it is fairly thick with tags and note cards.


There are also some pretty tags scattered throughout... in the pockets. They are all free printables that I found online here and there.


...........and then I made one for my 3 year old great nephew... don't know how much he'll play with it, but I thought he might enjoy the little tags and pictures I put inside..... and he might have fun taking things out and putting them back in..... I hid a couple of little tiny envelopes inside with messages inside...... for all I know he'll tear it up! but oh well.... it was fun to make.


Who could resist monkeys and robots?????


My husband's granddaughter just had her sixteenth birthday, so I made a little "note" book for her, filled with tags and places to write all those secret notes a 16 year old needs.


The butterfly paper was so pretty... all glittery... but you can't see it in the photos. 


 I did some doodling on the center white "hinges".


Hidden envelopes here and there............ 


.........an envelope tucked in the back with some money inside! What else does a 16 year old want???  I used my We Are Memory Keepers Envelope Punch Board to make all of the little envelopes. I just love that tool! I use it all the time.


I made one more darling "note" book but forgot to take pictures! It's for a beach dweller friend and it was so sweet and "beachey". If I can get her to take some pictures, I'll post them. The tags inside are just wonderful and fun!

This post is long enough I think... so will hopefully post  a few pictures next time... of my not-so-sad garden.... but really.. there is not much blooming yet. We are having such a long, cold Spring.. if you can even call it Spring. At least I don't have to look at all the dead stuff now....

Memories of last summer........
Take care all.......


   photo Blogsignature2smallersizeforblog_zps20ad3d10.png