Saturday, December 30, 2017

Why did I make this?

I had an unusual request from my step-son, to make a photo album for his girlfriend for Christmas. Why was it unusual you ask? Well.... he asked if I could make it using a Sugar Skull theme. My mind started immediately whizzing.... hum.m.m.m where could I get Sugar Skull scrapbook paper? How would I decorate it? 

I started seeing Sugar Skull figurines and coloring books a couple of years ago and I loved them! They were so colorful and bright and pretty, and CUTE. I love cute and I love colorful. I had no idea the WHY of them, just that I liked them. I felt a little guilty liking them, thinking maybe they were unChristian or just something to scare people. That's not my thing. I AM a Christian lady. But something drew me to them.


To my amazement, when I visited my son and his girlfriend in Astoria last year, I found that SHE had a Sugar Skull collection of just about anything you could imagine (above)! Of course she had the skulls, but she also had an apron, dishes, mugs, dish towells, etc. She then told me their history and meaning. 

I never realized, and was glad to learn, that the skulls are part of a cultural tradition that started long ago in Mexico, which was a celebration known as "The Day of the Dead" on November 1st and November 2nd of each year. These two days were set aside to celebrate loved ones who had departed.  In addition to other festivities, skulls were molded and used to make little sweet treats, in the shape of the skulls, to be placed on the deceased love one's grave. They were decorated exquisitly and the name of the deceased would be inscribed on its head.


Mexico, abundant in sugar production and too poor to buy fancy imported European church decorations, learned quickly from the friars how to make sugar art for their religious festivals. Clay molded sugar figures of angels, sheep and sugar skulls go back to the Colonial Period 18th century. Sugar skulls represented a departed soul, had the name written on the forehead and was placed on the home ofrenda or gravestone to honor the return of a particular spirit.
(excerpt from History of the Day of the Dead.

There is so much history surrounding the Sugar Skulls! I didn't mean for this to be a history lesson......but if you want to read more, you can click on the link HERE. It is really fascinating, and the cultural tradition carried forward into the "New World" in the 18th century. This tradition is also celebrated in Italy, Spain, South America and the Phillippines as All Souls and All Saints Day. 

It's a wonderful way to celebrate the memories of our loved ones who are now gone. I like this tradition alot.

My son and his girlfriend last Halloween.
Anyway........... I kind of got off the subject of my photobook! But I thought this history was so interesting, I just HAD to give you a Sugar Skull lesson!

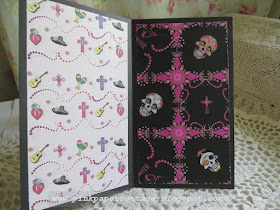
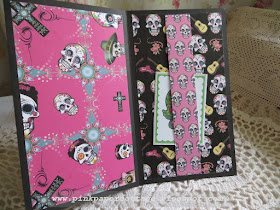
Here's the photo book I came up with. It's fairly large, about 6" x 9" I think. (It's gone now and I forgot to measure it!)


I found some digital papers on Etsy and downloaded them to use. The shop name is CraftedInDigital on Etsy. There were 10 different papers and I can use them over and over, as many times as I want to. I LOVE digital papers! So I printed out the ones I liked.


I put pockets in two areas, to hold some cute tags I found at DigitalCollageClub on Etsy.


I mean...... sugar skulls on deep purple paper? Love it! Love the hearts on the black and white striped paper too. 
 

I made this strictly as a photo album, to place photos in. The "belly band" that holds it closed is black ruffled elastic with a pretty blingy button on it. The album is nice and thin and not bulky and full of thick embellishments.


ON ANOTHER NOTE:

I made some really sweet "snowman soup" hot cocoa folders for my three step granddaughters and really like how they turned out.


Red elastic "belly bands".

This paper is really fabric that I scanned into my computer and then printed it on paper! I have so much pretty Christmas fabric that I wanted to use some. On the left, is a little packet of marshmallows. I used some of the scanned fabric on my Christmas cards.


Here are a couple of my "fabric to paper" Christmas cards:


I have two yards of this Christmas skull fabric and hubby wants a western shirt made out of it. Hum.m.m.m. wonder if I'll ever get that done? I just don't sew clothing like I used to! Sure made a pretty card though! Oh..... now that I look, the background "paper" was also some gorgeous Christmas fabric.


ONE LAST NOTE:

Wanted to let you know, I'm having a SALE in my Etsy shop, My Pink Paper Cottage until January 5th. 20% OFF ALL OF MY CHRISTMAS ITEMS.

Finally got my tree decorated by December 22nd!..... and my handmade Nativity set put out..... and my hutch filled with my Christmas squishy elves and Santas. 


HAPPY NEW YEAR EVERYONE!

~Marilyn~


Saturday, December 23, 2017

MERRY CHRISTMAS!

As usual, I'm doing last minute things in preparation for Christmas Day! I just wanted to take the time to wish each of you a very wonderful and MERRY Christmas eve, day and New Year's week, with your families and friends.

Each one of you, who takes the time to comment on my blog posts, is very much treasured by me and appreciated! I feel such a connection with each one of you!

Thank you for sharing your lives with me............ God Bless you and thank you for enriching my life.

~Marilyn~

Friday, December 15, 2017

What did I make?

Hi lovely ladies,
In my post yesterday, I mentioned that I put a few more things in my Etsy shop, so here they are!  A quick share:

You NEED to check out the cute tags inside!


Check out the hidden pocket!


Go see what's inside!

And as a reminder, here are a few other Christmas items:

Canvas board wall art for Christmas.
Lots of paper rosettes for decorating your packages and gift bags!

This is just a sampling of my paper rosettes.... some may have sold but there are quite a few left.
You can visit my shop, MyPinkPaperCottage HERE.

Have a nice day!  I'm sure everyone is busy busy busy with Christmas preparations.............

~Marilyn~

Thursday, December 14, 2017

December doings.....

I'm experimenting.....trying a post from my tablet. It's kind of hard to do as  I can't see what I type!  We'll see how this works!  I happened to have some pictures on my tablet I wanted to post.

I started my cardmaking early (in November) and here it is December 13th and they are in the same state they were in before Thanksgiving! (unfinished). What's a girl to do?   I maybe wasn't going to make cards this year, but it felt too weird not to.  I'm attempting simpler cards this year and trying to keep Christmas more simple.


Even trying to keep things simple, doesn't seem to be working for me! Life just keeps tumbling along doesn't it?


Everyone posted such beautiful photos of their Fall and Thanksgiving decorations and I just didn't do too much this year.  My hubby and I had a very simple dinner of ham and (storebought) scalloped spuds.  My mom used to make such delicious scalloped cheesy potatoes for Thanksgiving, but they are a lot of work! So I opted for simple this year. The Reeser's brand of cheesy baked scalloped potatoes is pretty darned close to my mom's! (and I don't usually even like the Reeser's brand).  I didn't even make a pie, which I ALWAYS do, but ended up making some (awesome and gluten free) sugar cookies instead. I just couldn't not have dessert! 


Hubby and I both agreed that these were the BEST sugar cookies we've ever had! And they came from a box! Yup.... good old Betty Crocker has a boxed mix for GLUTEN FREE sugar cookies! Wow.... I must send her a thank you note!  (and of course, my homemade vanilla cream frosting DID help!).


I just wanted to touch bases with my followers.... you have all shared such wonderful Christmas posts of your decorations, trees, houses, etc. and I have enjoyed them all, and try to comment when I can. Sometimes I'm using my tablet, so my comments are short. I feel so remiss regarding my Christmas decorating, but......... my (faux) tree is up and lit. I have yet to decorate it though. 

These last 2 or 3 years, I just haven't gotten the mojo for Christmas decorating.. but I'm trying this year as my sister and her husband are coming for Christmas day. 


My ceramic nativity scene is not even out yet, but I did get the box down from the closet shelf! When Christmas decorations are stored hither and yon, it seems like we are apt not to lug them out, am I right?

We did manage a (late) trip for Thanksgiving to my son's place in Astoria, Oregon, which happened a week later than planned, as I was sick, and then hubby got the bug, so we had to delay the trip. I shot some photos of Multnomah Falls, which was on our way, one of the tallest waterfalls in the U.S. (I think?). See the quote below. They are east of Portland, OR and I used to drive by them all the time when I lived in Portland, but haven't been there for at least 15 years. What a sight..... I had forgotten how majestic they are, and my camera just did not capture their splendor.

This is the "upper" falls.
Here's a quote from Wikipedia: The falls drops in two major steps, split into an upper falls of 542 feet (165 m) and a lower falls of 69 feet (21 m), with a gradual 9 foot (3 m) drop in elevation between the two, so the total height of the waterfall is conventionally given as 620 feet (189 m). The two drops are due to a zone of more easily eroded basalt at the base of the upper falls.[5]

See the (teeny tiny) footbridge in the lower middle of this photo? That is where people can walk to to view the upper falls!

Here's that footbridge close up, and the "lower" falls. This area was closed for the winter so I couldn't get as close as I wanted to.
Here's another quote from Wikipedia: Multnomah Falls is the tallest waterfall in the state of Oregon. It is credited by a sign at the site of the falls, and by the United States Forest Service, as the second tallest year-round waterfall in the United States.[6] However, there is some skepticism surrounding this distinction,

And here's the photo that is on the Wikipedia website... so much better!


And here's the "historic" Multnomah Falls Lodge. It's still in operation today as a restaurant and gift shop. It was completed in 1925. 


We had a great time in Astoria..... were there 3 nights and tried to squeeze so much into a short trip. My son's fiance and I cut holly and fir boughs from their property and both made a grapevine wreath. This was my first attempt at a wreath!


My son's fiance has the most beautiful dark brown hair with purple streaks in it! I love it.. and jokingly told her I should do mine that way...... and then I thought, why not? I'm 70... I can do whatever I want right? I did decide though, on pink rather than purple!  She put the color on and I think it came out just right (below).  The new me!


When we got home, I got busy on making a few new items for my Etsy shop FOUND HERE , and I'll do a share in my next post.

Bye for now.... have to get busy finishing up those cards!

~Marilyn~

Friday, November 3, 2017

Rock wall, catio and other news.....

Thought it was time for an update on our yard progress and our rock wall! Here it is November already and I can't seem to keep up with Father Time.. he gets way ahead of me and I can't keep up. I just realized why...... as we get older, we can't run as fast!  Oh boy........

I'm trying not to overload this post with photos, but I've taken so many and just like to share them, so I guess I WILL overload it with photos! 

ROCK WALL:

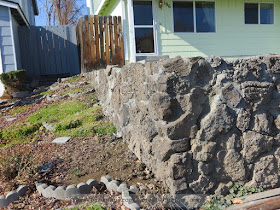
Our front yard rock wall is almost completely done! I'm so happy! Thought I'd show you pictures now as I was so excited to take them on the day they finished up. All that's left is to put some different kind of sealer in some of the cracks left in the wall, and especially the big crack where the wall was almost falling down. It was pretty neat to watch them back a big truck into the wall and push it back towards the house about a foot!

They dug out behind, cut off some of the "dead men" to allow for pushing the wall back, and put LOTS of rebar in to hold it to the dead men... plus put rebar in to attach the front wall to the side wall that was falling down.


Look at all that dirt piled up on my pretty green lawn! eeeeekkkkk... but it went right back in the trench  fairly soon so didn't ruin the lawn.

Bolts in the front go way through to attach to the dead men.
Here is the wall right after they pushed it up.. had to brace it until they got the rebar and bolts in:


Wow.. it's standing straight and tall again!

Front view.............(hubby always seems to be in the picture - his legs anyway)
Wall to side of house (below).... pretty much repaired and straight.. still looks "rustic" but we wanted to keep that look. I think the two holes in the front got patched and painter guy is going to use some special sealer to make it look like rock.


He re-cemented the top of the side wall, and along the front too. Looks really nice.
Catio:

Our catio is totally done now! It's attached to the garage so it won't blow away..... we raised it up on blocks and put a floor on the bottom. Carpet is in and snuggly blankets in the upstairs area. Ready for the kitties when (and if) we got on a little trip (which may be happening on Thanksgiving!).


Kitty door to the garage is by the little red bench. They like to come out and sit on the bench.

The whole purpose of the "catio" is to keep our cats locked in the garage if/when we go somewhere for more than a day.... and they can have their food and water in there and be safe from the neighborhood strays.... but they can also come outside for some fresh air. Boy what we don't do for our cats!! 

ROAD TRIPS:

We managed to find time to take a little drive east of us, about 60 miles into the Ochoco Mountains. It was really pretty... a gorgeous Fall day (end of September) but I didn't take pictures! Bad me. There was a little bit of Fall foliage to see.. and of course stopped on the way back for some ice cream!

Just last week, I FINALLY got to drive west of us towards the Cascade Mountains. I've been wanting to do this since we moved here two years ago! I was craving big trees and water.. so off we went. I have been curious as to how far we would have to drive before we would some some actual "forests".

About 40 miles (and an hour and a half later), here is what we saw:


Can't tell you how thrilled I was! But..... the down side is.... the road to get there was horrible! Very washboardy and bumpy and not good at all. Poor hubby was sure our truck would fall apart. But it was worth it to see BIG trees, big Pines, huge Douglas Firs,  Hemlock and Cedar. We were also surprised to see the Tamarack changing colors to gold........ what a wonderful sight to behold!

The washboard road had some gorgeous views of Mt. Jefferson, but I didn't take pictures of that because a big forest fire had been through that area, and it was not a pretty sight. Very disappointing to see that area scarred like that.

My main objective for this drive, was to see some water! Here is "The river we didn't get to see, The Metolius":

Photo compliments of a website I found. Not mine.
And........... I thought we would see a river, so I held off taking pictures until we got to the river......... but...........darn it......... we took a wrong turn (due to the negligence of the navigator-me) and ended up not crossing the ridge we were supposed to cross to get to the river. I got totally turned around, so we ended up driving on THIS side of the ridge, rather on THAT side, so never did see the river. 

And it's a big beautiful river too.. the Metolius, which runs north of Sisters, Oregon up to the headwaters. There are campgrounds and beautiful spots to sit by the river, and cabins and well... just gorgeous. I was there many years ago. But we didn't get to see it.

We ended up in Sisters, which is a quaint, touristy, western town. I planned to end up there anyway, but would have been via the Metolius River. As it was, we had lunch there, and found a pretty little sitting area to take some "golden" pictures.


What a pretty day and the leaves were really putting on a show for us! I did mange to find a creek outside of Sisters with a little exploring. I knew it was there "somewhere". So I got to see some water, plus a peek of Mt. Jefferson through the trees.


So my soul is refreshed for awhile longer now.

BIG NEWS:

I'm very excited to say that I've re-opened my Esty shop! I pondered on it all summer after I closed it. I went through "Etsy withdrawals" for awhile too. I just didn't have the time to manage the shop over the summer. But..................... I've been on a crafting tizzy again, so figured I'd better have somewhere to share my projects. There's a widget link to my shop on the top right side bar. It should take you to all of my goodies there! 

I've added some new items. Here are a few:

Photo booklet.

Photo "flip flap" folio album with tags.

Smallish photo booklet.

Christmas photo booklet.

Digital "instant download" poem The Woodshed, that my husband wrote several years ago. I made the design with photos from his friend's woodshed and the snow backdrop is from our property in Washougal, WA.
I have alot of digital downloads in my shop. I just love making them and love adding quotes to my photography. I have so many that I haven't even added to my shop yet! All in good time I guess..........  Here's a link to my shop: My Pink Paper Cottage.

CAMPER PROGRESS:

Well... not a whole lot as been done ON the camper, but we've bought a few things and had the tie downs put onto the truck so we can actually carry it! Hubby just got the botton plywood box (that slides into the truck) painted.


He has taken the two old leaking top vents out and the holes are ready for new ones to be installed. We're having that done next week. Hubby decided he really didn't want to attempt it, as he wants to be sure they are sealed really well. To go have the vents put in, we have to get the camper ONTO the truck! Keep your fingers crossed as we've never done it before.

He HAS been working inside, tearing out most of the water damaged paneling.... we've had about two garbage cans full of yucky pieces of paneling and 2x2's. I'm amazed though, that more areas are fine and not damaged by water. We mostly have to replace the paneling on the bed part that goes over the truck roof. That will come with time (and money).

CRAFTING:

I'm on a crafting roll lately as I said. I've made several photo books and albums that are different than the little pocket albums I usually make. They are now in my Etsy shop, and I have about 3 more almost done. It's so fun and addictive. 

I'm also loving purchasing little downloadable vintage tags from online places, like Etsy and Artfire.com. I found a darling vintage luminary made from paper, that you fold up and glue and it's a cute tall birdhouse that stands up, and you put the little electric tealight inside. I love it!


Isn't it the cutest thing? The lady has it in different colors and themes. This is pink with a bird, and she has a similar one in blue, plus many for Christmas, Fall, birthdays, etc. The shop is Seneca Pond Crafts on Artfire.com. It costs $2.50 to download this printable and the blue one. What a deal and so fun.

Although I decided not to make too many Christmas gifts this year, I did want to make a little tag album for one of my family members, so came up with this one and it was so fun to make. I used some cute Christmas tags I got from Seneca Pond Crafts. (I'm not being paid to give her a shout-out.... I just LOVE her vintage tags and 3-D paper projects!).

I'm still addicted to making these little tag photo albums. Now that I can download and print hundreds of different tags, I'm even more in love with them! 


I used one of my sweet little paper "rosettes" on the cover. I have a ton of these in my Etsy shop. They are so great to use on packages and gift bags, or even cards. 

Well... I guess that's enough photos and news for now. 

Have a good weekend everyone!

~~Marilyn~~