


So I thought I'd try a paper radiant star to put on a card. First, I tried folding the squares of paper, but it made the star way too thick. After some trial and error, I came up with this:
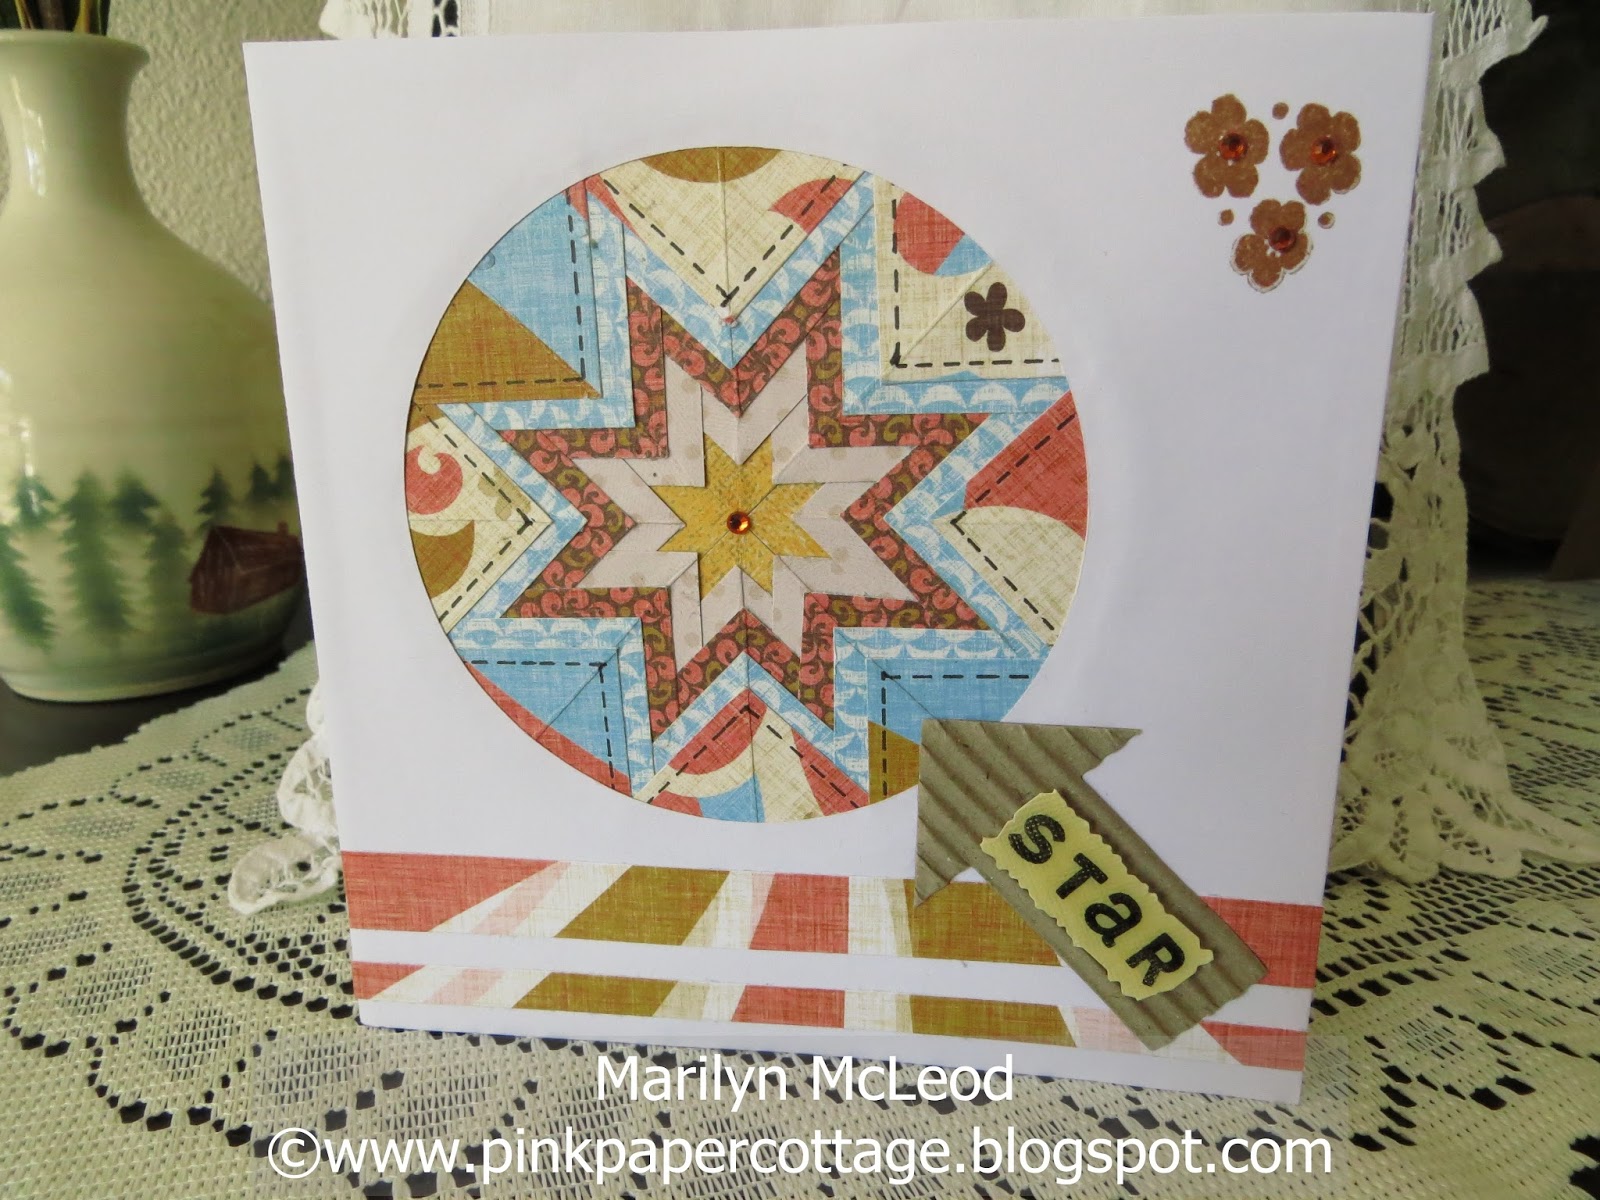
Wow, I kind of like that! It only takes some little scraps of paper to make the star. If you have 5 different colors of paper, either designed or plain, measuring about 2"x4", then you can have a go at it. I used the 6x6 samples we consultants get of the B&T (background and texture) papers. I used the Surf's Up papers (now retired), just for something different besides pink and green which I usually gravitate towards. I really like how it turned out.
I've been asked to do a tutorial on this technique, so here goes. It may be a little long but it's well worth it, because these are gorgeous and fun to make.
Here's the card I made for this tutorial (below) which are, of course, pinks and greens! I used some scraps of my (retired and beloved) Chantilly papers.

So let's get started! I'll tell you 3 or 4 steps, and then put a picture that helps explain what I just did.
1. Pick out 5 different papers, that coordinate, part light colors and part dark colors. I found that the bigger prints don't work as well. In the blue and orange star card above, you can see that I used small prints and even a plain beige, except for the outside of the star, which is where the large print should be. In the pink star, some of the colors kind of melded into each other and made the star less defined, so choose good contrasting colors. Use your scraps!
2. Cut eight 1-1/2" x 1-1/2" squares of each color. BE AS ACCURATE AS POSSIBLE.
3. Cut each little square on its diagonal by placing it point to point on your paper trimmer. BE VERY ACCURATE.

4. As per above picture, lay your triangles out in the order you'd like them to appear on your star, making sure each color is a nice contrast to the next. You don't want to lay two similar colors next to each other on the star.
5. Now fold each triangle in half and finger crease. This helps to find the center of the long edge of the triangle. Yes I know.. you're probably groaning and going geez... do I HAVE to do that? It's optional whether you fold. If you don't fold, you really do still need to put a little mark at the center point of the long edge of the triangle. I like to do the fold as it makes it look more like folded fabric. It's up to you!
6. Cut a 6"x6" piece of copy paper. This is what you will mount the little triangles onto to make the star. Fold it in half both ways, and then diagonally both ways and mark folds with a pen. SEE BELOW RIGHT.

8. Take 4 of the triangles (from now on called "Ts") and place them points all facing at the center of the copy paper. See first picture, top left, below. They should butt up tightly to each other. I used tombo adhesive to adhere them down. Be sure the tips that meet have plenty of adhesive on them. Same goes with gluing all of the other Ts, make sure the tips are totally covered with adhesive (or you can use glue).
9. Now for second row, choose the next colors that contrast nicely. Start by laying the first T of this second row, 1/4" from the point of the first T that you placed in the first row. Put adhesive on as you go. I usually put adhesive on all 8 pieces, then stick and go. Much faster.
See below picture, top right. You'll see that this 1st T in the second row is right on top of the T in the first row, but 1/4" down from the point. Keep the sides parallel to the other Ts and use the lines you have drawn on the copy paper to line up the fold of the T or the little mark you made on it, with the lines on the copy paper.
10. Place each T in this second row, next to each other and down 1/4" from the previous points. Glue as you go or all at once. I use a ruler for an exact 1/4". If you don't remain exact on this 1/4" measurement, then the star gets wonky really fast! SEE BELOW DIAGRAMS for the entire second row of Ts. I work in a counterclockwise direction.


Per above, you'll see that after you've laid this second row of Ts, you now have a little star in the middle. It should look fairly even on all sides. Mine looks a little wonky but part of it is because the colors aren't contrasting enough.
11. Now do the 3rd row the same. Start in the same place as you started the second row. You can tell where to start because there will be one T that is on top. I really don't think it matters though, where you start your next row so don't worry about it.
12. SEE BELOW photos for the next rows I did. This is FUN and goes really fast. You can do it while watching TV.

Again, you can see that the star on each row is a little mushy looking, as the colors did not contrast enough. The big prints in the Chantilly paper (white background) just did not give a definite color wave, but that's OK, I fixed it later. You can see how nicely the bright pink paper makes a very definite star. It's nice to have at least one paper color that pops over the others.
13. Here's a close up of what the finished star looks like (below). You can see how the folds that I made on each little T (to get the center point) make it look more like fabric.

14. Now, we're ready to mount the finished star on the card or project. As shown below, you need to draw a circle around the star so you can trim off the excess copy paper. For this project, I cut a 4" circle using my Cricut machine. If you don't have a Cricut, use a compass or other template you may have.
15. Place the 4" circle over the star and center it just right, so all edges look even and don't cut off any of the tips of the stars. Draw a line around the circle and cut on the line.

16. You now have a nice circled star! I laid it on the pink card I chose (5-1/2" x 5-1/2" card base) to see how it would look and to figure out where I want to mount it on the card. YOU DON'T JUST LAY IT DOWN ON THE TOP OF THE CARD. You have to actually mount it from underneath.
17. After you know where you are going to place the star, poke through the middle of your star circle so that it makes a little hole on your card base. Put your punch mat underneath the front of the card so that you don't poke through the bottom of the card! I forgot to do that, but fixed it by mounting the sentiment on a piece of paper over the hole on the inside of the card!

18. Inside middle picture (above) is the inside of the card where we really don't want a hole! but it can always be covered up somehow.
19. Now use your Cricut to cut a 3-3/4" circle on the front of your card, using the little punched hole as your center point. Or you can use a circle drawer/cutter. You want the edge of the hole to be very smooth and concise as it will show (see far right above).
20. Once the hole is cut out, you will mount your circle star underneath. Put your adhesive on the right side of the circle star and then carefully place it underneath so that it is even and all points of the star show. See below left photo - star has been mounted from underneath and you can see a slight impression where the glue is. Be sure to use your bone folder to press down all edges really well.

21. You will see that the points of the star are cut off a little bit (above). I would have cut my circle out of the card at 3-7/8" but my Cricut won't cut 1/8's so it's OK this way.
22. Right photo above shows the inside top of the card. Since the back side of the circle star shows, I cover it up with another piece of matching cardstock or you could use a different color or design. In the blue and orange star card (at the top of my post), I put white cardstock on the inside, and then decorated it with some fussy cuts from Surf's Up paper, to show the waves. Sorry, I don't have a photo of the inside of the card with me! I'm doing this post from my sister's house and didn't bring that picture with me.
23. In the above photo on left, you can see that I did some dotted lines to imitate stitching around the outer star. I like that look. I used a nice fine point black permanent pen and a little ruler and made the stitch lines 1/4" from the edges. Closeups below show without stitching and with stitching.
24. In the far right photo below, you can see that I made little tick marks with my black pen, using a half circle clear ruler, so I could do some scallops around the circle.

Here are my drawn scallops.. not perfect, but OK (lower left).

25. On the above right photo, you can see that I decided to do some stitch marks on the green star, as it looked a little faded and blended too much with the green and white paper. I did the stitch marks right next to the white design paper. I like how it defines the green star much better.
And here's the finished card. I fussy cut some flowers from the Chantilly design paper and adhered them to the card. I also drew some little stitch lines around those, and the little bird that I cut out. I popped up one flower with foam tape, and put a little gem in the middle of the star (to cover up the punched hole).


On the inside of the card (above), I added a sentiment and a strip of the Chantilly B&T paper.
I LOVE my Radiant Star cards! I hope you will try one. I'm going to be making more, that's for sure. You can make your star any sie you want to by using smaller squares or larger squares of paper to star out. My fabric Radiant Star at the very top of this post used 3" squares of fabric and the finished star is about 8" in size. Experiment and have fun!
Feel free to print out this tutorial and keep it to use for future projects.
Enjoy!

Thank-you so much for sharing your card and how you made it. The directions are super clear and I can't wait to try making one! Your stars are beautiful!
ReplyDeleteGlad you like it Janice. You will LOVE making this! I'm anxious to start my next one too. I may try even a smaller star, maybe with 1" squares. Email me if you have any questions. Marilyn
DeleteAbsolutely amazing! What you called the Radiant or Folded Star, also known as the Somerset Star, is one of my favorites. Not long ago, I shared a quick photo tute with a friend who wanted to know how one was created. But it certainly never entered my mind that you could make one out of paper. Wow and double wow! Loved this!!
ReplyDelete